TPMS Sensor Replacement Guide
If your dashboard keeps flashing that annoying tire pressure warning light even after you fill your tires, your TPMS sensor might be the real problem. This little device sits inside your wheel and tells your car when tire pressure drops too low. When it stops working right, it can drive you crazy with false alerts or no alerts at all.
In this article
This guide walks you through the whole process in plain words. You will learn what a TPMS sensor does, how to tell when it needs to be swapped out, what tools you need, and how to do the job step by step. By the end, you will feel confident enough to handle this task yourself or at least know exactly what a mechanic should be doing.
What Is a TPMS Sensor and Why It Matters
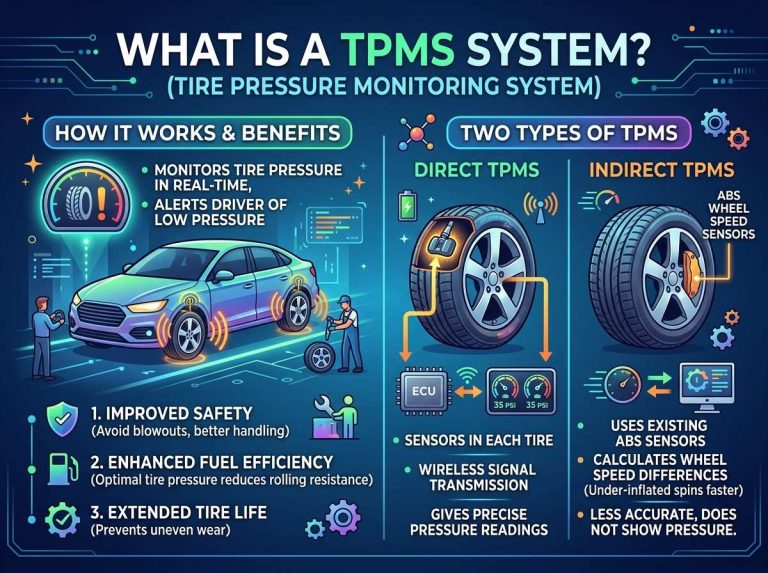
TPMS stands for Tire Pressure Monitoring System. It is a small electronic part that sits inside each wheel, usually attached to the valve stem or strapped to the wheel rim with a metal band. Its job is simple: check the air pressure inside your tire and send that data to a receiver in your car.
When pressure drops below a safe level, the sensor sends a signal, and your dashboard lights up with a warning icon shaped like a horseshoe with an exclamation mark. This warning system exists for a good reason. Low tire pressure causes uneven wear, poor fuel economy, and in bad cases, blowouts on the highway. A working sensor keeps you safe and saves you money on gas and tires over time.
There are two main kinds of TPMS setups you should know about:
- Direct TPMS: Each tire has its own sensor that measures actual air pressure and sends real numbers to the car’s computer.
- Indirect TPMS: This system uses your car’s wheel speed sensors (the same ones used for ABS) to guess pressure based on how fast each wheel spins compared to the others.
Direct systems are far more common in modern vehicles and are the type most people mean when they talk about TPMS sensor replacement.
Signs Your TPMS Sensor Needs Replacement
Before you rush out to buy a new sensor, make sure the problem actually comes from the sensor itself and not something else, like a slow leak or a software glitch. Here are common signs that point to a failing or dead sensor:
- The warning light stays on constantly, even right after you fill all four tires to the correct pressure.
- The light blinks on and off randomly with no real pattern, especially when driving over bumps or rough roads.
- One tire always shows a different reading than the rest, or no reading shows up for that tire at all.
- The battery inside the sensor has died. Most TPMS sensors run on small batteries that last around five to ten years. Once the battery dies, the whole sensor becomes useless and needs a full swap.
- You just got new tires installed, and the shop mentioned the sensor got damaged during the tire change. This happens more often than people think, especially with cheap tire shops that rush the job.
- A scan tool or diagnostic reading confirms sensor failure. Many auto parts stores offer free scans that can pinpoint exactly which sensor has quit working.
If your car shows any of these signs, it is time to look into a replacement rather than ignoring the light and hoping it goes away.
Tools You Will Need Before You Start
Getting everything ready ahead of time makes the whole job go much smoother. Here is a list of tools and supplies that most people need for a standard TPMS sensor swap:
- A jack and jack stands (or a full hydraulic lift if you have access to one)
- Lug wrench or impact wrench
- Tire iron or bead breaker tool
- New TPMS sensor (matched to your car’s make, model, and year of manufacture, though we won’t be naming specific dates here)
- TPMS relearn tool or scan tool
- Valve core removal tool
- Torque wrench
- Rubber gloves and safety glasses
- Tire mounting lubricant
If you plan to remove the tire from the rim yourself, a tire changing machine helps a lot, though plenty of people manage with basic hand tools and some patience. Many folks choose to just buy the sensor and let a local shop handle the mounting part since removing tires from rims without the right machine can damage both the tire and the wheel.
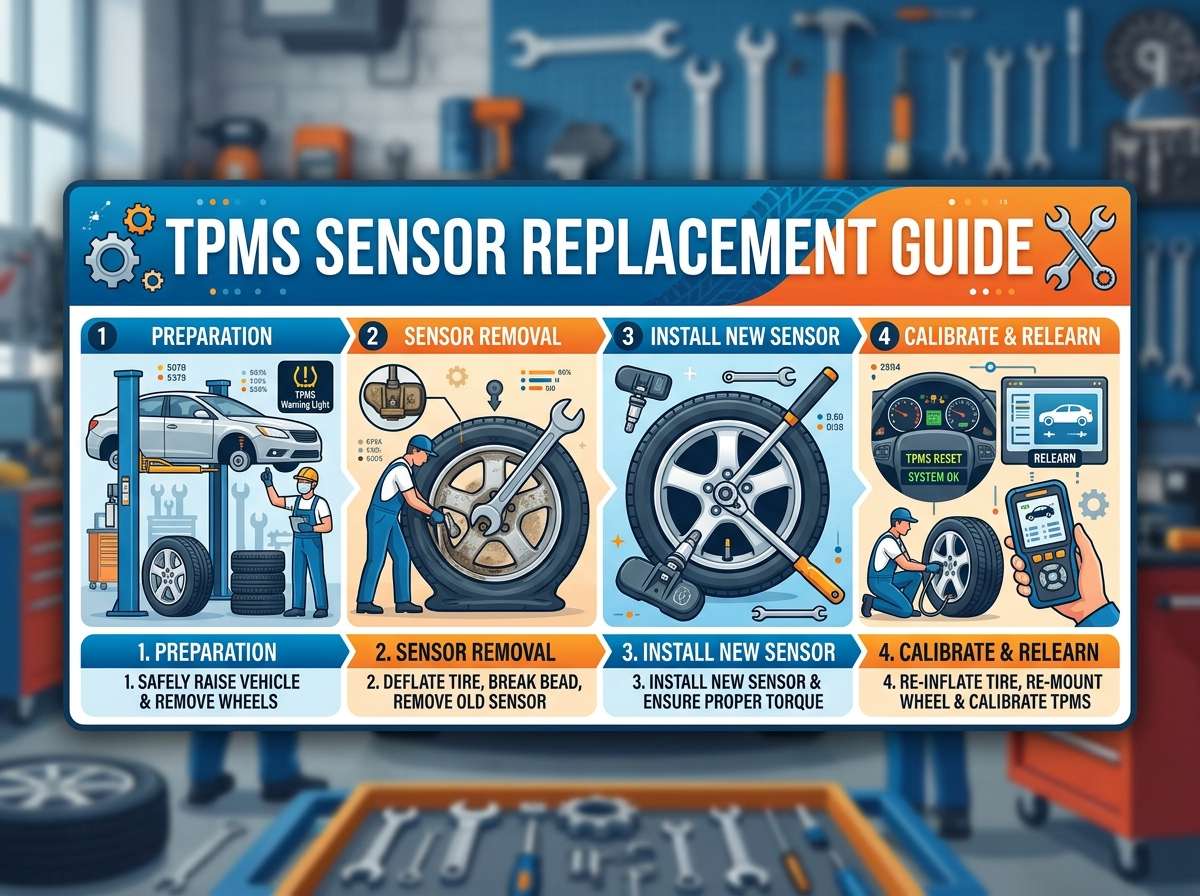
Step-by-Step TPMS Sensor Replacement Process
Now let’s get into the actual steps. This process assumes you are working with a direct TPMS sensor, since that is the type found in almost every car built in the last couple of decades.
Step 1: Confirm Which Sensor Has Failed
Use a scan tool to plug into your car’s diagnostic port (also called the OBD-II port, usually located under the steering wheel). This tool reads live data from each sensor and tells you exactly which wheel has the dead or faulty part. Skipping this step means you might waste time and money replacing a sensor that actually works fine.
Step 2: Loosen the Lug Nuts
Before lifting the car off the ground, loosen the lug nuts on the wheel you plan to work on. It is much easier to break these loose while the tire still has weight on it and grip on the pavement. Give each nut a quarter turn, just enough to break the tightness, but do not remove them yet.
Step 3: Lift the Car and Remove the Wheel
Place your jack under the correct lift point (check your owner’s manual if you are unsure where this is). Raise the car until the tire hangs freely above the ground. Slide jack stands underneath for safety, then finish removing the lug nuts and pull the wheel off completely.
Step 4: Deflate the Tire Fully
Using your valve core removal tool, take out the valve core to let all the air escape from the tire. This step matters a lot because you cannot break the tire bead or pull the tire off the rim safely with air still inside.
Step 5: Break the Tire Bead
Using a bead breaker or tire iron, press down along the edge of the tire where it meets the rim. This separates the rubber seal from the metal wheel, giving you room to pry the tire away from the rim later. Take your time here, and go slow around the entire circumference rather than forcing one spot too hard.
Step 6: Remove the Tire From the Rim
Pry the tire off the rim using tire irons, working around the edge bit by bit. If you have access to a tire changing machine, this step becomes much faster and safer. Be extra careful near the valve stem area since the old TPMS sensor sits right there and can get damaged if you are rough with your tools.
Step 7: Take Out the Old Sensor
Once the tire is off, you will see the old sensor attached either to the valve stem itself or strapped to the inside of the rim with a metal band. Unscrew or unclip it carefully. Check the surrounding area for any corrosion or damage while you are in there, since a rusty valve stem hole might need cleaning before you install the new part.
Step 8: Install the New Sensor
Line up the new TPMS sensor exactly where the old one sat. Screw it into place with the correct torque setting (your sensor’s instructions will list this number, and it usually falls somewhere between 4 and 9 pound-feet, so do not overtighten). A torque wrench really pays off here since squeezing too hard can crack the sensor housing instantly.
Step 9: Remount the Tire
Slide the tire back onto the rim, lining up the valve stem hole with the sensor. Apply tire mounting lubricant around the bead to help it slide into place smoothly without pinching or catching on the sensor housing.
Step 10: Inflate and Seat the Bead
Put the valve core back in and inflate the tire to the recommended pressure listed on the sticker inside your driver’s door frame. You should hear a couple of pops as the bead seats itself against the rim edges. Check the pressure again once everything settles.
Step 11: Reinstall the Wheel
Lift the wheel back onto the hub, thread the lug nuts on by hand first, then lower the car back to the ground. Finish tightening each lug nut in a star pattern using your torque wrench to the exact spec your car manufacturer recommends.
Step 12: Relearn the Sensor
This last step trips up a lot of people because it gets skipped entirely. New sensors have their own unique ID codes, so your car’s computer needs to “learn” this new code before it will read data correctly. We cover this part in detail in the next section.
How to Relearn or Reset a TPMS Sensor
Every car brand handles the relearn process a bit differently, so this section covers the general approaches you will run into.
Auto-relearn method: Some vehicles automatically pick up the new sensor after driving around for fifteen to twenty minutes at speeds above 30 mph. The car’s computer scans for signals and matches them on its own, no extra tool needed.
Stationary relearn method: Many cars require you to sit in the driver’s seat with the car turned on (not running, just in accessory mode) and follow a specific button sequence. This often involves holding down the TPMS reset button, found under the steering wheel, until the light blinks twice, then driving briefly to lock in the new codes.
Scan tool relearn method: For more complex systems, a dedicated TPMS relearn tool gets used to manually trigger each sensor and register its code directly into the car’s onboard computer. This tool gets held near each valve stem, activates the sensor, and confirms the new ID.
Always check your specific owner’s manual for the exact relearn steps since procedures vary a lot between brands and even between different models from the same brand.
Common Mistakes People Make During Replacement
A lot of folks run into trouble because they skip small details that end up causing bigger headaches later. Here are mistakes worth avoiding:
- Forgetting to replace the rubber valve stem seal. Most direct TPMS sensors come with a rubber grommet, cap, and core that should all get swapped every time, not reused from the old part.
- Overtightening the sensor nut. These parts are made from lightweight materials that crack under too much torque.
- Skipping the relearn process entirely. Your dashboard light will stay on forever if the car’s computer never registers the new sensor.
- Buying a sensor that does not match your car’s frequency. TPMS sensors broadcast on specific radio frequencies (usually 315 MHz or 433 MHz depending on region and model), and the wrong frequency simply will not communicate with your car.
- Damaging the sensor during tire mounting. Rushing through bead breaking or tire removal often cracks the sensor housing, meaning you end up buying a second replacement.
- Not checking battery type ahead of time. Some sensors have replaceable batteries, but most modern ones are sealed units that require full replacement once the battery dies.
Taking your time and double checking each step saves you from repeat trips to the parts store.
Cost Breakdown for TPMS Sensor Replacement
Prices vary depending on your car brand, sensor type, and whether you tackle the job yourself or pay a shop. Here is a rough breakdown:
- Sensor part cost alone: Ranges from around $20 to $80 per sensor depending on brand and vehicle compatibility.
- Labor cost at a shop: Usually falls between $10 and $50 per tire if you already have the tire off, or more if the shop needs to dismount and remount the tire too.
- Full four-sensor replacement: Can run anywhere from $150 to $400 total including parts and labor at most shops.
- DIY savings: Doing it yourself with your own tools can cut costs down to just the sensor price plus any tire shop fee for mounting, often saving 40 to 60 percent compared to a full shop job.
Dealerships tend to charge more since they often use original equipment sensors, while aftermarket sensors from reputable brands work just as well for a fraction of the price in most cases.
How Long Do TPMS Sensors Actually Last
Most sensors last between five and ten years before the internal battery runs dry. Driving habits, climate, and road conditions all play a role in how long yours will hold up. Cars driven mostly on smooth highways tend to see sensors last longer than cars driven on rough, bumpy backroads where constant vibration wears down internal components faster.
Extreme heat also shortens battery life since heat speeds up chemical reactions inside small batteries. If you live somewhere with brutal summers, do not be surprised if your sensors need replacement on the earlier end of that range.
Tips to Make Your TPMS Sensors Last Longer
- Check tire pressure manually at least once a month using a separate gauge rather than relying only on the dashboard warning system.
- Avoid hitting curbs or potholes hard, since sharp impacts can crack sensor housings even without warning lights appearing right away.
- Ask your tire shop to confirm they use TPMS-safe tools during every tire change or rotation.
- Keep tires properly inflated overall, since chronic low pressure puts extra strain on the sensor’s internal pressure-reading mechanism.
- Replace the rubber valve stem components every time tires get changed, even if the sensor itself still works fine.
Frequently Asked Questions
Can I drive with a bad TPMS sensor? Yes, you can still drive safely, but you lose the early warning system that alerts you to low pressure. Check your tires manually with a gauge until you get the sensor fixed.
Do I need to replace all four sensors at once? Not usually. Most people replace just the one sensor that fails, though some choose to replace all four together if the car has high mileage and the other sensors seem close to their expected lifespan.
Will a tire shop reset the TPMS light for free? Many shops include this service for free if they installed the new sensor, but some charge a small fee if you bring in your own part and just want the relearn process done.
Can I replace a TPMS sensor without removing the tire? No, the sensor sits inside the tire attached to the rim, so the tire has to come off the wheel completely to access it.
What happens if I install the wrong frequency sensor? The car’s computer simply will not recognize it, and your warning light will stay on permanently since no signal gets received at all.
Final Thoughts
A failing TPMS sensor might seem like a small annoyance, but it plays a big role in keeping your tires safe and your fuel bill lower over time. Now that you know the signs of failure, the tools required, and each step of the replacement process, you can decide whether to tackle this job yourself or head to a trusted shop with confidence, knowing exactly what should happen.
Taking care of small car maintenance tasks like this one adds up to big savings and fewer surprises down the road. Keep an eye on that dashboard light, listen to what your tires are telling you, and your TPMS system will keep doing its quiet job of keeping you safe mile after mile.

Peterson is an automotive safety enthusiast and product reviewer with a passion for helping drivers stay safe on the road. He researches and tests dash cams, backup cameras, TPMS systems, emergency tools, GPS trackers, and other vehicle safety products to provide honest, practical recommendations. Through CarSafeties.com, Peterson shares in-depth reviews, buying guides, and maintenance tips to help drivers make smarter and safer decisions.